The Perfect Podcast Equipment for Any Situation
This article is for business owners who podcast and record great content, not people who are trying to create the most perfect audio possible and spend thousands on podcast equipment. This article has been updated as of April 2024.
There are a ton of equipment options for recording your podcast.
The vast selection is overwhelming for most people, but the good news is that you don’t have to be a tech genius with an NPR studio and a huge budget to create a good-quality recording.
Through helping 30+ entrepreneurs start and produce their own podcasts with our Podcast Launch Services, I’ve nailed down the perfect podcast recording equipment and setup that you can use for your show.
In this article, I’m going to share with you the exact recommendations I give clients for both hardware and software tools.
My picks are based on the following criteria:
Easy to set up and reliably easy to use (minimum confusion)
High-quality audio recording capability
Reasonable price tag
At the end of the day, it’s just not worth it to spend a ton of time, money, and effort to get that last 1% of audio perfection for your podcast. Listeners care a lot more about how good the content is.
Instead, I recommend simple podcast equipment setups that are easy, don’t require a huge investment and still produce quality sound.
FIRST THINGS FIRST
Before you can decide on recording equipment, you need to know the type of podcast you’re doing.
Here are the 4 most common types of recording situations:
Solo Episodes – You talking / teaching as the only host without a guest
Interview or Co-hosted – You and a guest or cohost that aren’t in the same location
In-person – You and one or more people in the same room
Video Interviews – You and a guest or cohost doing a video interview
Each of these podcast styles has different physical equipment and software requirements that you’ll find below.
At the end of this article, we’ll also talk about how to test your new recording setup to make sure everything’s working properly!
1. Microphone

My top mic pick for solo shows is the Blue Yeti.
This is the mic that I personally use for all my recording.
It’s portable or permanent, sounds amazing, and plugs right into a laptop or audio recorder with a USB cord, so you don’t need a mixing board or other confusing tech.
You can also plug it into other recording devices or mixing boards if you choose with a different cord (XLR), so it works for various setups.
2. Windscreen

A mesh windscreen that fits over the end of your mic is always a good idea to reduce the harsh p’s and other mouth sounds that inevitably come up when recording audio.
3. (Optional) Microphone Boom Arm
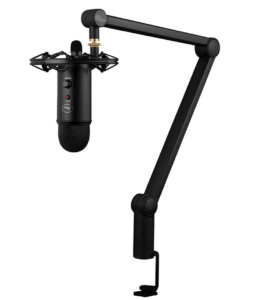
Optional, but the Blue Yeticaster Professional Broadcast Bundle comes with a boom arm that is handy if you plan to record your episodes from a desk setup. While recording you can position the microphone perfectly, and when you’re not, swing it back out of the way.
A Podcast Microphone Alternative
There are also some really good headset microphones out now, so if you’d prefer a super easy headset that records impressive audio, the Sennheiser 8 Usb Headset is killer.
It’s also a VERY reasonable price and you get way more than you pay for in this case. It’s equipped with a USB jack that plugs straight into your laptop along with other plug options if you get dangles and records incredibly consistent sound since it keeps the microphone a consistent distance from your mouth as you speak, regardless of where you’re looking as you talk.
Whether you get a microphone or a headset is 100% personal preference so the best option is whichever appeals to you most to get started!
SOFTWARE
If you’re flying solo on the mic, then the best option for software is Audacity.
It’s a simple tool that’s free, easy to use, and super straightforward on how to record. Plus, it works for both Mac and PC users.
There are endless tutorials and how-to’s on Youtube so you’ll never be at a loss for how to use Audacity.

PODCAST INTERVIEW OR COHOST SETUP
PODCAST EQUIPMENT
For you as the host, and any recurring guest or cohost on the show, I recommend the exact same hardware setup options laid out above.
If you record an interview podcast, don’t worry too much about your guest’s microphone setup. If they have a microphone of some kind, great. If they don’t, usually a normal pair of earbuds that have a microphone in them work really well.
SOFTWARE
My top recording software recommendation for EASY call conferencing is Zoom.
It’s free for one-to-one calls and for up to 45-minute-long group calls. (After 45 minutes, group calls cost $15 per month.)
NOTE: Zoom is not the highest quality audio recording. It’s pretty good, but if you want crystal clear audio see my recommendations below in the Video Interview section.
PRO TIP: Use the desktop version of Zoom, not the web browser version. It works better for recording higher quality calls!
What our clients tend to love about this software is that you can record straight from your laptop and have someone call in from a phone number or while also on their laptop.
That means you don’t have to worry about using two separate tools like Skype and a Skype recording software.
You simply email your guest a link that opens up on their computer (Mac or PC) and you have a phone call through your internet connection.
Once the call is complete, you get a recording file of your conversation and you’re all set!
It also allows you to record with or without video, so there’s plenty of versatility when it comes to how you want to put out your content.
TIPS FOR OPTIMIZING YOUR ZOOM AUDIO QUALITY:
Record your audio and your guest’s audio on separate tracks. This allows for a cleaner edit, as it gives you more control over editing and post-production. In order to do this, go to Zoom’s “Settings” and click “Recording.” Then check the box next to “Record a separate audio file for each participant who speaks.” Here is a screengrab to show you what this looks like:

With this setting in place, you’ll get the usual folder after the recording with three files: the joint audio, the video, and a chat transcript. You will also get an extra folder called “Audio Record” that contains the .m4a file for each speaker. The latter are the files you’ll want to use for editing.
Pro Tip: You may also want to check the box at the bottom next to “Keep temporary recording files.” This can come in handy if something happens to your computer during the call and will give you a chance to recover the interview if it’s lost on your side. If you do this, make sure to also check the bottom box next to “Choose a location for recorded files when the meeting ends” so that you know where these files are saved!
2. Test your microphone before recording. To do this, verify that your microphone appears in the list of available mics. Make sure to select it from the dropdown, and then use the “Test Mic” button to record some test audio and play it back.

Pro Tip: Be aware of plosives and keep an eye on your levels to ensure that the audio is not distorted or clipped when you’re speaking. This is another reason test recordings before the interview are a great idea.
3. Make sure to use headphones. This will help avoid having echoes of other speakers on your side of the audio. You can test them in a similar way as the microphone by clicking on “Speaker” and selecting your headphones to run a test. To do this, click on “Test Speaker” until you hear the Zoom ringtone in your headphones.
Pro Tip: It’s usually a good idea to select the “Press and hold spacebar” unmute shortcut. Zoom calls work best when everyone is muted except for the speaker, and the spacebar command makes it easier for people to unmute themselves quickly without having to click around.
4. Keep a consistent distance from your microphone/laptop. If you’re using a microphone, I recommend staying about 3-5 cm back and speaking directly into the mic at a consistent angle to ensure a solid signal.
5. Minimize background noise and potential disturbances. Make sure to mute your phone, turn off notifications, close any windows, etc. And don’t forget to ask any guests to do the same on their end!
6. Try not to fidget. It’s easy for your mic to pick up on every little sound, so try to be still while you’re recording. Mindless messing with things on your desk, your knee bumping the table, tapping or drumming your fingers, etc. will come through in the audio, so it’s best to keep movement to a minimum as much as you can.
7. Test out different spaces. If possible, I recommend doing test recordings in different areas around your home or office space to find the best-sounding spot. To minimize reverb and echo, aim for rooms with minimal windows and tiled or hard surfaces.
Pro Tip: Adding curtains, pillows, mattress, etc. into the recording area will help absorb sound and reduce echo!
IN-PERSON RECORDING EQUIPMENT
For any audio recording with more than one person in the same room, you want to avoid having people crowd around a single mic.
It generally sounds bad and this simple setup will help you avoid that scenario.
Creating a solid setup for this style of show is easy enough that it’s worth it to get more podcast equipment. The additional gain will make your show sound that much better.
Here’s what I recommend:
BASIC PODCAST EQUIPMENT
1. Microphones

A great beginning mic for in-person shows is the Pyle-Pro Professional Moving Coil Dynamic Cardioid Unidirectional Vocal Handheld Microphone.
It’s great for when you’re starting out because it doesn’t pick up all the little sounds around you.
No barking dogs or traffic noises or other background distractions.
This mic only picks up what’s right in front if it, which makes the editing process much, much easier.
Just make sure to get enough of these microphones so that each person in your group has one.
2. Mic Stands

You’ll also want to make sure you have an adjustable, portable mic stand for each microphone. Holding your mics is certainly possible but it won’t give you the same sound quality for each person.
Try the Universal Desktop Microphone Stand Adjustable MIC Tabletop Stand with Spring-loaded Microphone Clip.
3. USB Audio Interface

To connect these mics to your computer, you’ll want to use the ART USB Dual Pre.
To start, I recommend keeping the gains set to 40.
4. XLR Cables
You’ll also need to get cables to connect the microphones to the audio interface.
The Pyle-Pro mentioned above does come with a cable, but it won’t fit in the above USB audio interface.
Instead, you’ll need the Audio2000’s C02003P2 3 ft XLR Male to XLR Female Microphone Cable. (If you need longer cables, the same link above will have options up to 50 feet!)

5. Pop Filters
Again, mesh pop filters are always a good idea for the best sound.
PREMIUM STUDIO RECORDING SETUP
1. Microphones

A great premium option for in-person podcasts is the Rode Procaster Broadcast Quality Dynamic Microphone with Rode PSA 1 Mount Studio Mic Boom Arm & PSM 1 Shockmount Bundle.
This is great for a more premium setup as it is specifically designed to offer no-compromise performance for voice applications in the broadcast environment.
This mic comes with an internal pop filter which is designed to minimize plosives and other sounds that can overload the microphone and distort the audio output.
The Rode Procaster Microphone is also equipped with superior ambient noise rejection, meaning it will not pick up a humming appliance or fan in the background.
This is a single bundle, so you will need to purchase two of these to complete your in-person interview setup.
2. USB Audio Interface

For studio-quality sound, you’ll want to use Focusrite Scarlett 2i2 3rd Gen USB Audio Interface for recording.
This audio interface achieves professional-sounding recordings with high-performance converters which enable you to record at up to 24-bit/192kHz.
It is also super easy to get this up and running with an online tool they provide called Easy Start.
3. XLR Cables

To connect the microphones to the interface of your premium setup, I suggest purchasing Cable Matters 2-Pack Premium XLR to XLR Microphone Cable.
These cables are designed for microphones and as they come in a pack of two, you will have one for your microphone as well as your guests.
SOFTWARE
For Mac users, the Audio Hijack and Fission Bundle is a great choice.
For PC users, click here to find comparable software.
You’re all set!
VIDEO PODCAST RECORDING EQUIPMENT
If you are searching for an additional way to promote your podcast, adding a video recording of your episode and uploading it to YouTube or other video content platforms may be a fantastic option for you.
This gives your content the ability to reach a wider audience and has the potential to give a more personal feel to your show.
Yes, this can be a more time-consuming process. However, if you’re truly wanting to take your podcasting to the next level, venturing into the video world is one of the best ways to go.
VIDEO EQUIPMENT
1. WEBCAMS

Although you can get away with recording from your smartphone or the camera off your computer, a proper webcam will increase the visibility and quality of your recording.
A great option for beginners, the Razer Kiyo Streaming Webcam has a built-in ring light, eliminating the need for additional lighting.
If you already own a ring light or you have access to great natural light, Logitech C922x Pro is a camera specifically designed and optimized for professional-quality video streaming.
Simply plug one of these into your computer and you will have a great starting point for a high-quality recording.
2. CAMCORDERS OR DLSRS

After something with ultra-high resolution?
Using DSLRs or camcorders offer excellent video quality and impressive overall performance.
Camcorders are built for recording videos, so that would be my first choice for you. The Panasonic Camcorder HC-V770 has an exclusive high-dynamic range feature that reduces bright spots and connects wirelessly to your smartphone.
Alternatively, there is the Panasonic LUMIX GH5 4K Digital Camera. This camera has dual image stabilization which eliminates blur and shakiness.
3. LIGHTING

Good lighting makes a big difference.
If you are already the owner of a good quality camera, good lighting can help the audience to better see and connect with you, your co-hosts, or your guests.
A ring light for your webcam is a good option for those looking for something low-maintenance and easy to use.
If you are looking for an upgrade from that, a ring light with an extendable tripod stand provides more control of how much light you have on your face at the time of recording.
My advice would be to ensure that you have even lighting across your whole face and avoid overly bright lights or harsh shadows.
SOFTWARE
When choosing software to use for your recordings, there are several things to be mindful of. First, you want to ensure that you are going to have a stable connection throughout your recording. On top of this, you want to be certain that your guests can easily understand what they need to do to join the recording. Lastly, you ideally want software that automatically backs up your files. With that, here are my software recommendations:
1. RIVERSIDE.FM

Riverside.fm is browser-based so there is no need for your guest to install any software.
Riverside’s audio quality is very good, with some reviews stating it is better than Zoom. The quality of the video is 4K regardless of how good or bad your wifi connection is, which is a huge advantage when trying to record a professional conversation.
As stated above, when you’re recording remotely, you need a reliable connection to ensure the conversation continues to flow. Some people have left reviews sharing that there have been some issues with this in the past, however, Riverside is currently working to improve this.
2. IRIS.FM

Iris.fm is modern and easy to follow without a complicated setup, so you don’t have to search for what you are trying to find.
Iris also gives you access to high-quality audio and video recording. It supports nine guests at once, allowing you to record conversations with multiple people. You are able to schedule your interviews ahead of time or invite guests to join you during a live recording. Regardless it is very simple to get your co-hosts and guests onboard.
Iris delivers your audio files in WAV and MP3, with video files available in MP4. Added bonus: Iris automatically backs up your local browser cache during your recording which ensures you never lose any clips of audio or video.
3. SQUADCAST.FM
SquadCast.fm is the most expensive out of my suggestions but it is also the most popular.
SquadCast, quite like Riverside and Iris, also has excellent sound quality for remote recording software. You are allowed up to four people in the recording and SquadCast also offers a unique tool, the green room, where you can add your guests to make sure everyone is ready to begin before recording.
If the connection happens to drop when you are recording, your precious audio and video will still be safe as SquadCast offers progress upload. This means your audio files are uploading while you’re recording in real-time.
HOW TO DO A QUICK TEST OF YOUR NEW PODCAST EQUIPMENT SETUP
All of these setups are easy to recreate on your own, but once you do, it’s important to run a quick test to make sure your audio is sounding as it should.
So once you’ve set everything up based on what you just read, follow these steps to test your recordings:
1. Make sure your audio input is coming from your podcast microphone.
In both your recording software AND on your computer, typically you’ll have to change your audio input settings to your external microphone. They will default to the computer’s audio input.
Make sure to do both of these things before you start recording. If you’re not sure how to with your computer or software, YouTube has the answer!
2. Check your audio levels
When you do an audio test, make sure you can see the audio levels moving up and down in your recording software when you speak.
If you can, then say a few test sentences, stop recording, and listen back.
From here, you can adjust the recording volume (also known as ‘gain’) up or down as needed.
If your voice sounds distant or has a weird echo, then you’ll need to go into some troubleshooting using Google or YouTube, but that’s beyond the scope of this article.
Troubleshooting Your Podcast Equipment Setup
This article here also covers the most common audio recording problems and troubleshooting to fix them.
WHAT COMES NEXT
Now that you’ve gotten your recording equipment setup figured out, you’re well on your way to creating great content.
If you’re not sure where to go from here to plan and launch an effective podcast for your brand, check out our How to Start A Podcast That Gets You More Clients article. Or if you want more direct help, our Podcast Launch Program may be the service for you.
We handle all of the heavy lifting with a 5-step process to help you plan, create, and launch a podcast in 6 – 8 weeks.
You focus on recording content with your new gear while our team handles ongoing production and publishing so you don’t have to do any of the grunt work.
Ready to launch a show? Schedule a call with us!